Programming Concepts for VFX is a deep dive into the maya.cmds library and Python scripting, moving us from manual artists to system architects. Before this class, I treated 3D software as a canvas I had to paint on manually. Now, I see it as a database I can manipulate. The goal wasn't just to learn syntax; it was to stop being the variable in the system and start being the designer of the system. Coding demands a different type of endurance than artistic sculpting. It forces you to confront the empty script editor with pure logic, requiring the discipline to build systems from scratch rather than relying on pre-made plugins or off-the-shelf tools to bridge the gap.
Project 1 & 2: Animated Pixel Art Quilt
For Project 1 & 2, we were tasked to first create a 20x20 pixel art quilt, then animate it, and eventually build the quilt in Maya and render it. Inspired by one of my favorite pixel art games, Stardew Valley, I drew my pixel figures using a free online sprite editor called Piskel. The animation frames and their color information were exported to a C file stored in a list. I then used Python to parse through the C file and procedurally generate the pixel art quilt in Maya.
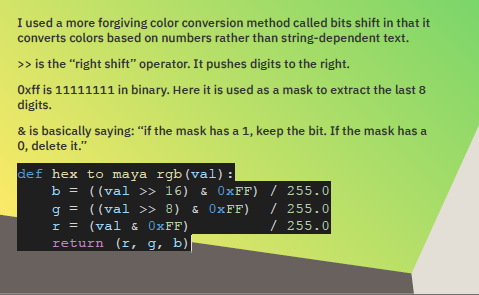
The color coming from C files is stored in Hex format. Maya reads color in RGB in a range from 0 to 1. There are two ways to convert color as I know of. One is the string indexing method, where you extract part of a string at a time and read its information. The other is the bit-shift method, which pushes the desired color channel information to the far right of the string and uses a mask to extract the end data. Though the bit-shift method could avoid truncated leading zeros often found in C files, Prof. Sean pointed out that for this specific project, the string indexing method is more efficient.
I also learned about the Regular Expression (re) library from Gemini. This library is especially powerful in pattern matching and text manipulation. Some of the functions I used include re.search(), re.match(), re.group(), re.findall().
I was also introduced to the concept of Defensive Programming — the practice of anticipating failures and writing code to prevent them. This gave me a new perspective on coding. I used to think that as long as my code runs, I should be satisfied. Now I take more factors into consideration. Does my code run on different operating systems? Does my code require a specific type of input to run? What would happen if the input is slightly different?
Project 3: Procedural Newton's Cradle
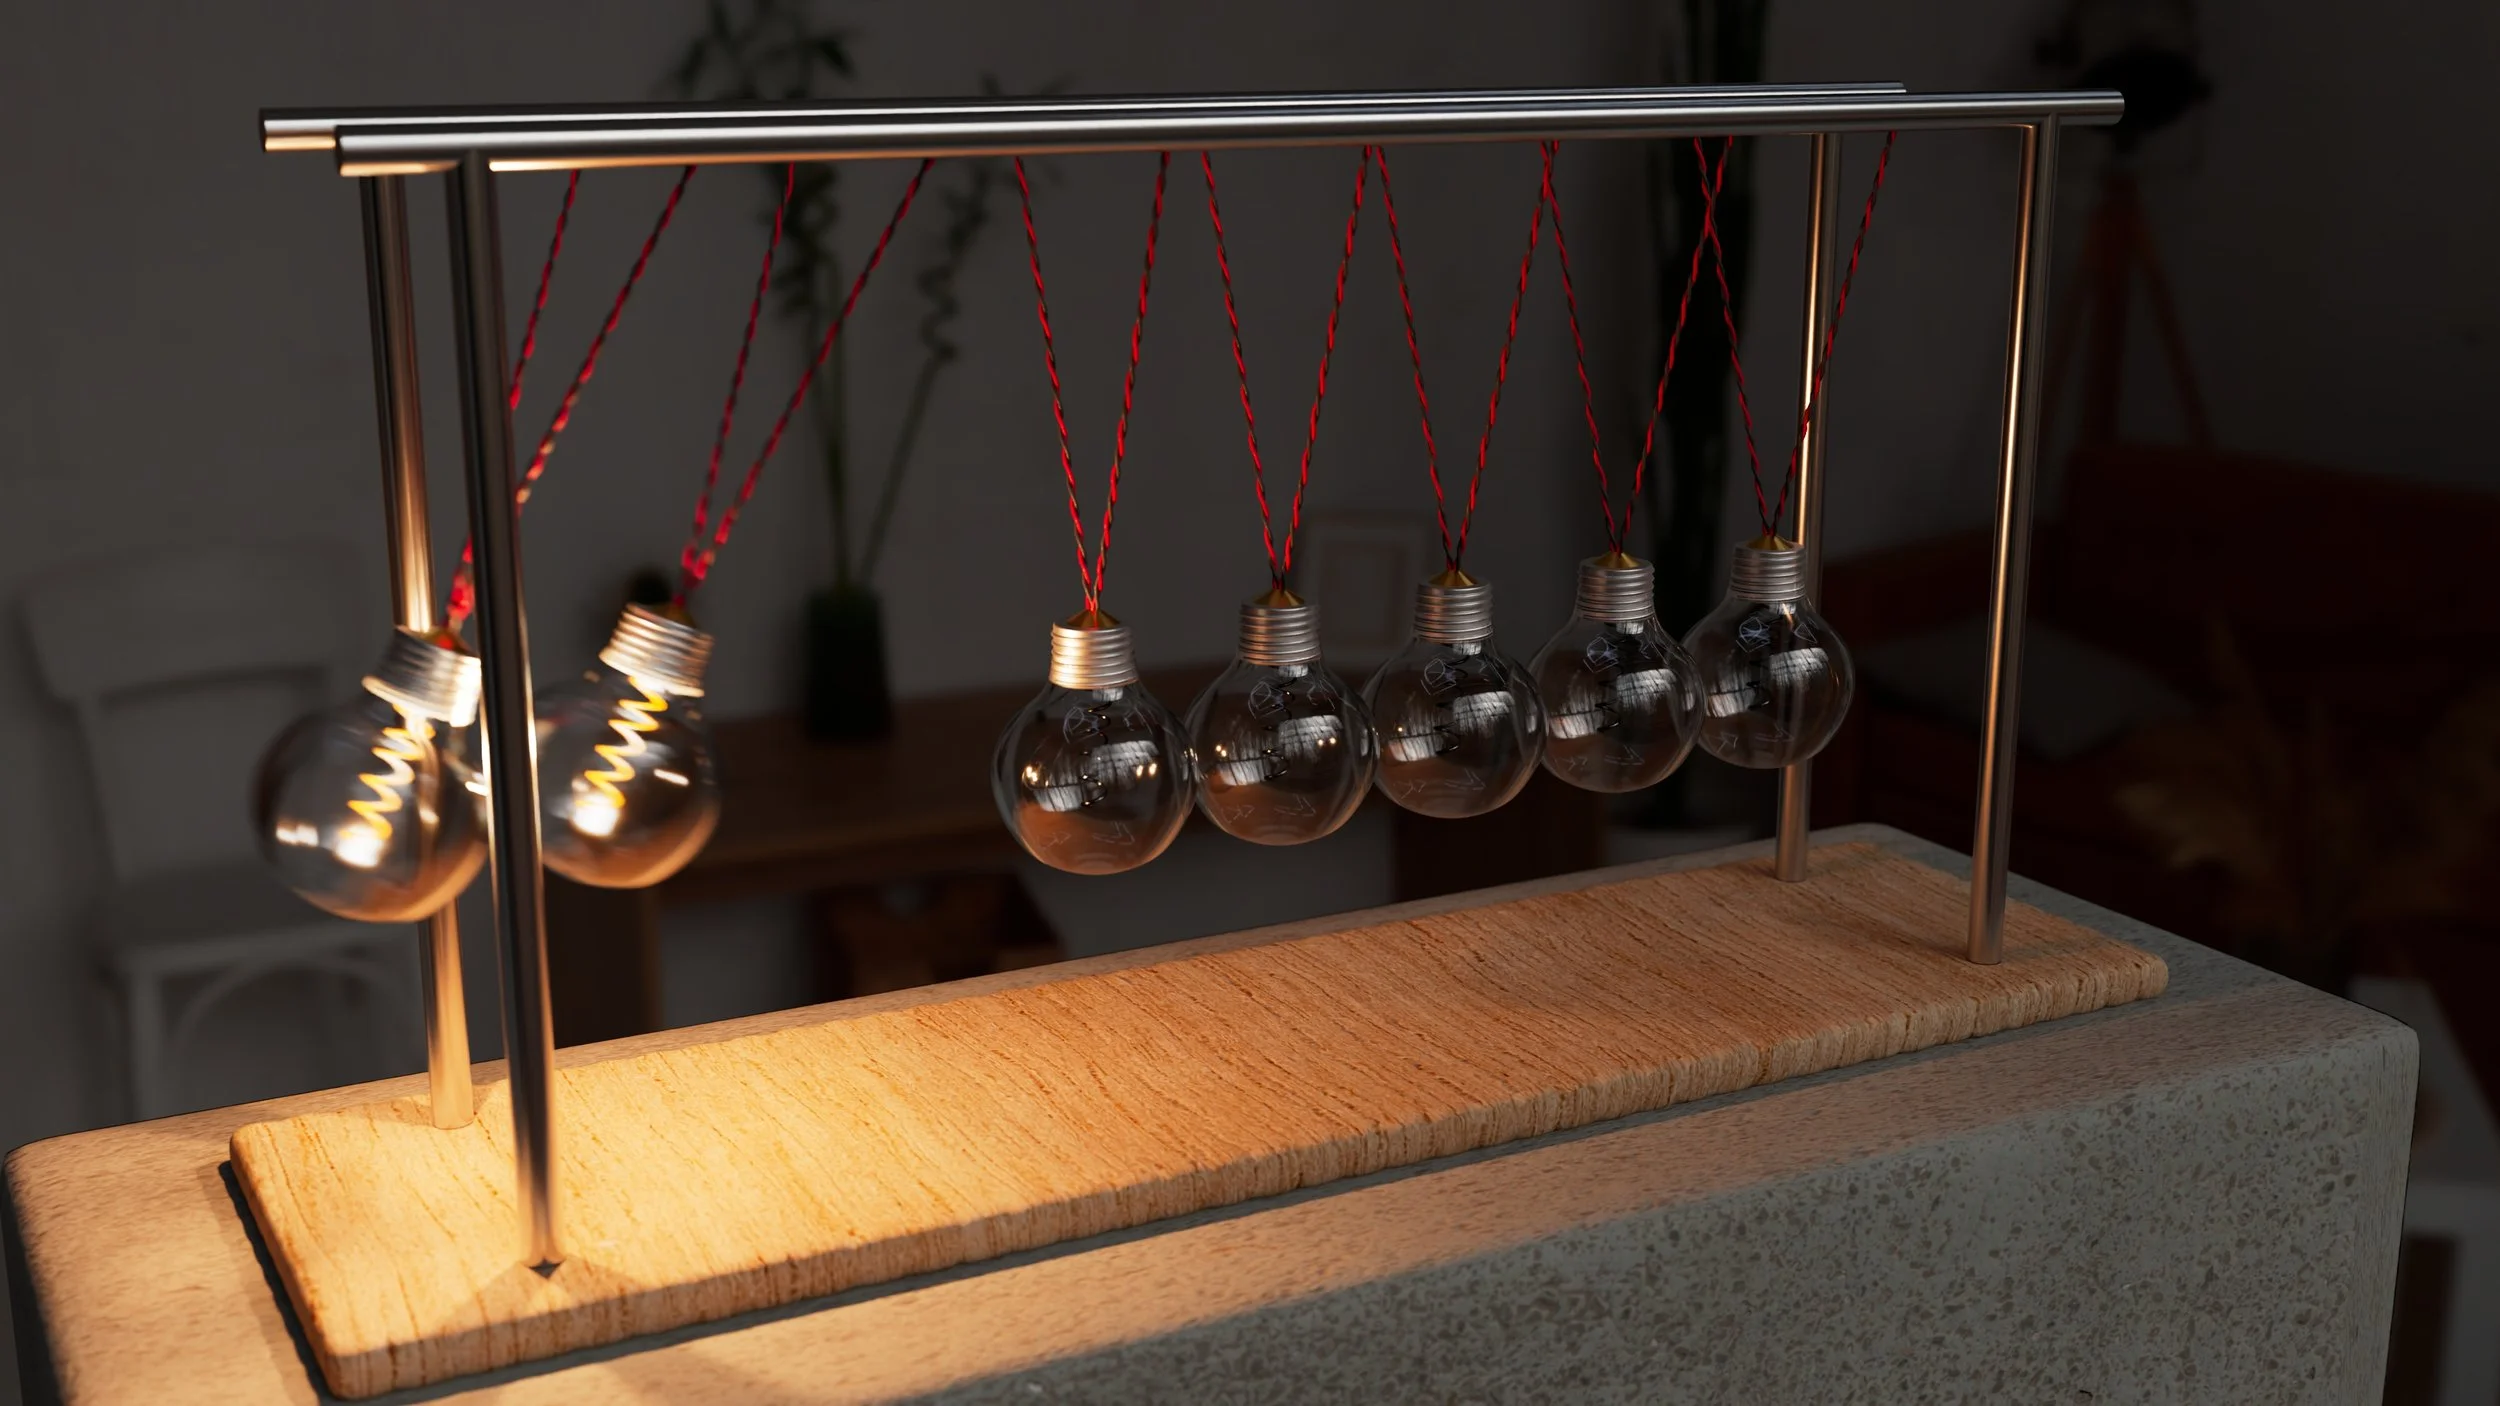
For Project 3, the objective was to create a fully procedural generator for a Newton's Cradle. The catch? No manual modeling allowed. Everything — from the glass thickness of the bulbs to the twisted wiring — had to be generated by code at runtime, controllable via a custom UI.
Modeling with Code
My biggest hurdle early on was the wooden base. In manual modeling, you just grab edges and bevel them. In code, I initially got what I call the "Marshmallow Effect" — polySmooth destroyed the corners of my cube because I hadn't programmed the support loops correctly. I learned the hard way that procedural hard-surface modeling requires a "Bevel-First" logic. I had to implement a specific order of operations: generate the cube → apply a tight mathematical bevel → calculate World Space UVs using polyAutoProjection → then smooth. This ensured the wood grain texture didn't stretch, regardless of the dimensions the user chose.
I also found that the cmds.polyBevel function is a bit outdated in terms of its algorithm. cmds.polyBevel3 is the most up-to-date bevel function — in some situations it resolves the Ngon problems polyBevel created.
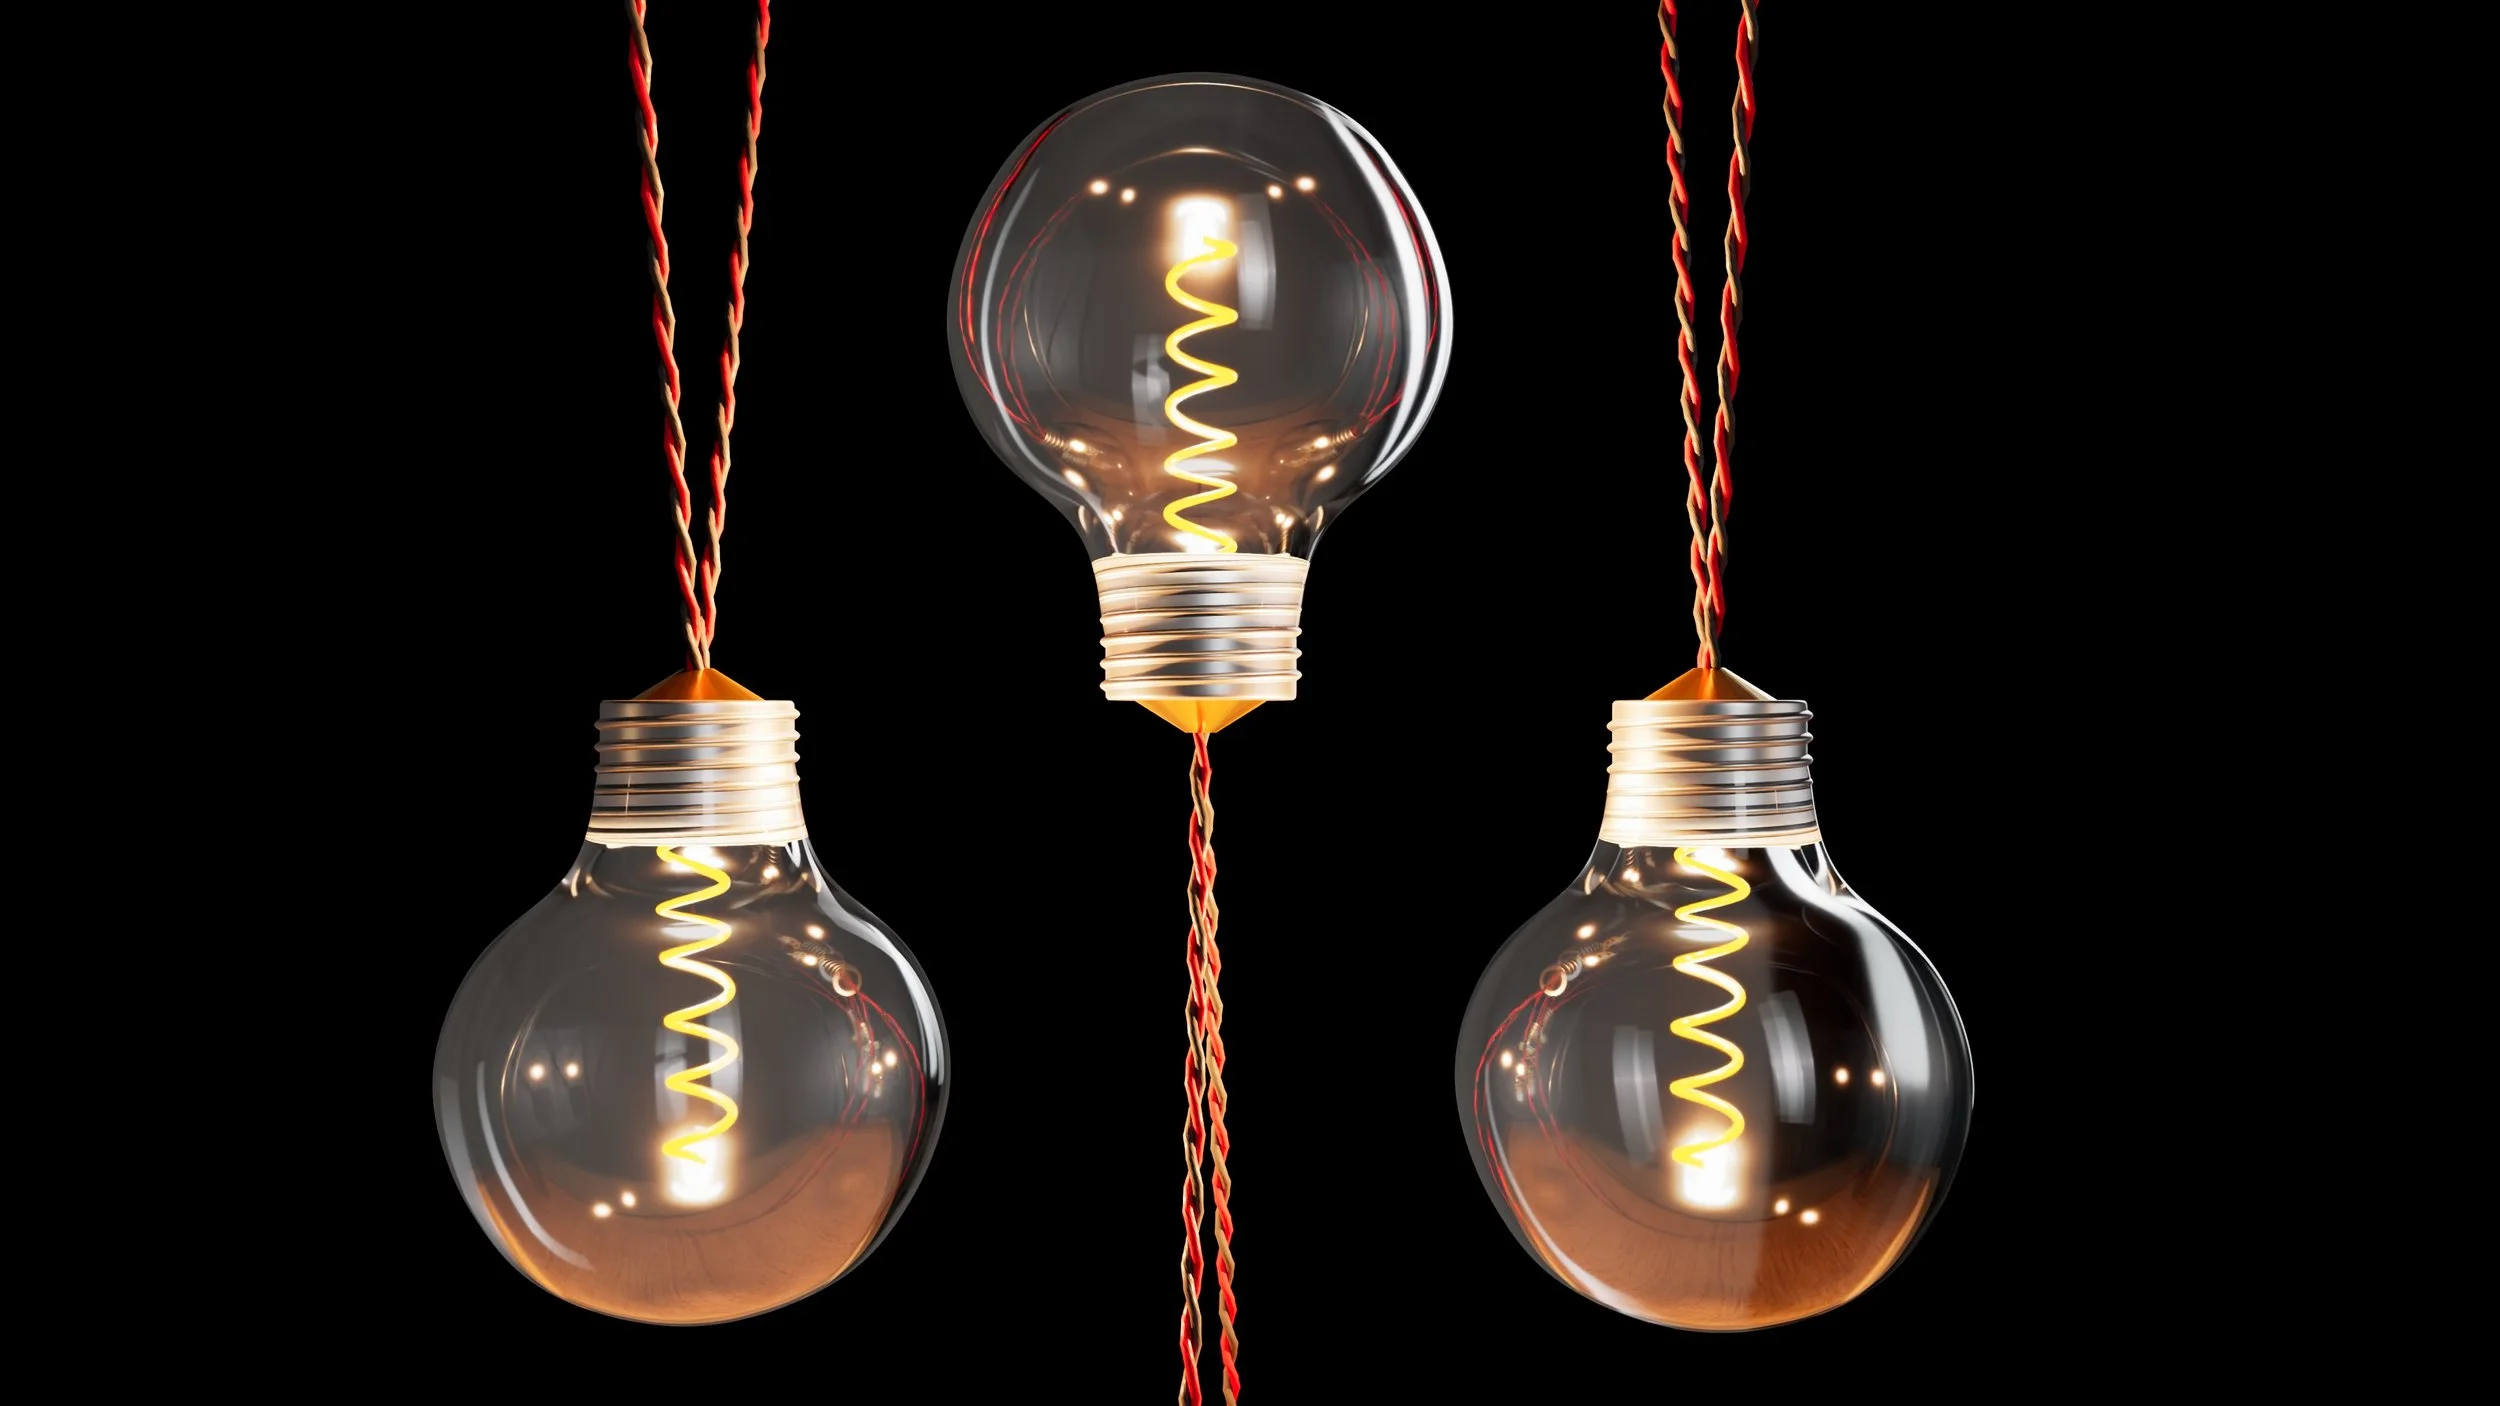
Besides that, modeling the round bulb glass mesh was challenging. I asked Gemini to generate a set of points representing the shape of a vintage bulb and revolved them around a NURBS curve to create the smooth glass mesh. To ensure the glass had thickness, I reversed the outer points list, offset them inward, and joined them by two (0, 0, 0) points at the beginning and end to ensure the curve closes at the center axis.
Regarding the twisted wires, I first modeled two thin cylinders with a high number of edge loops along their height, then used the twist deformer to achieve the look.
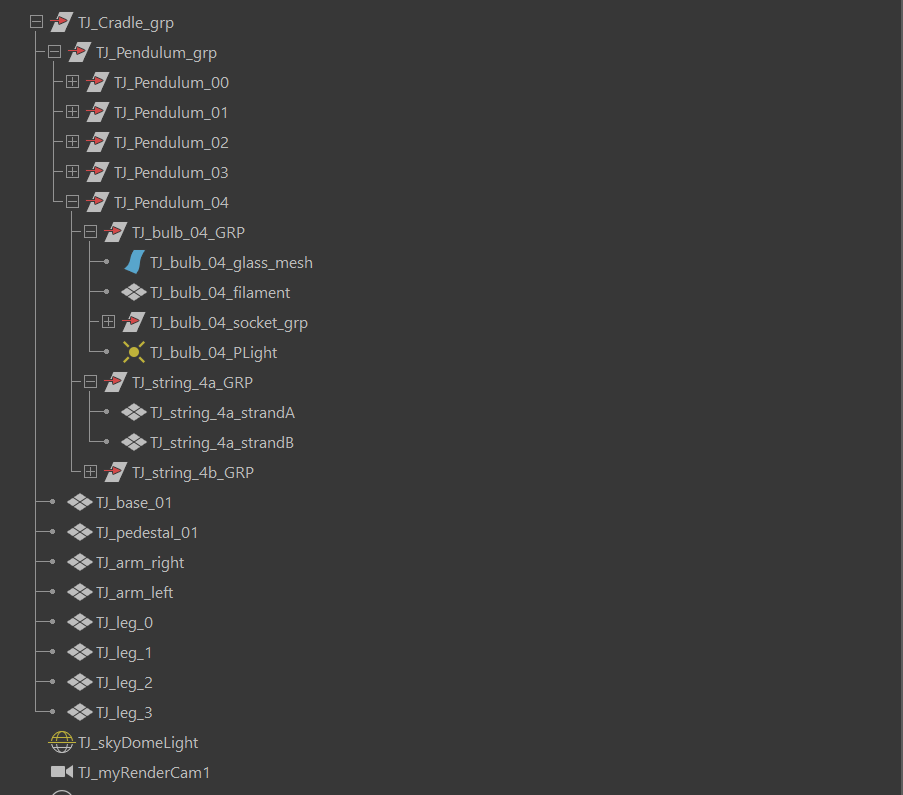
During the procedural creation of the assets, I grouped them into a logical hierarchy for easy access.

The Animated Lighting Logic
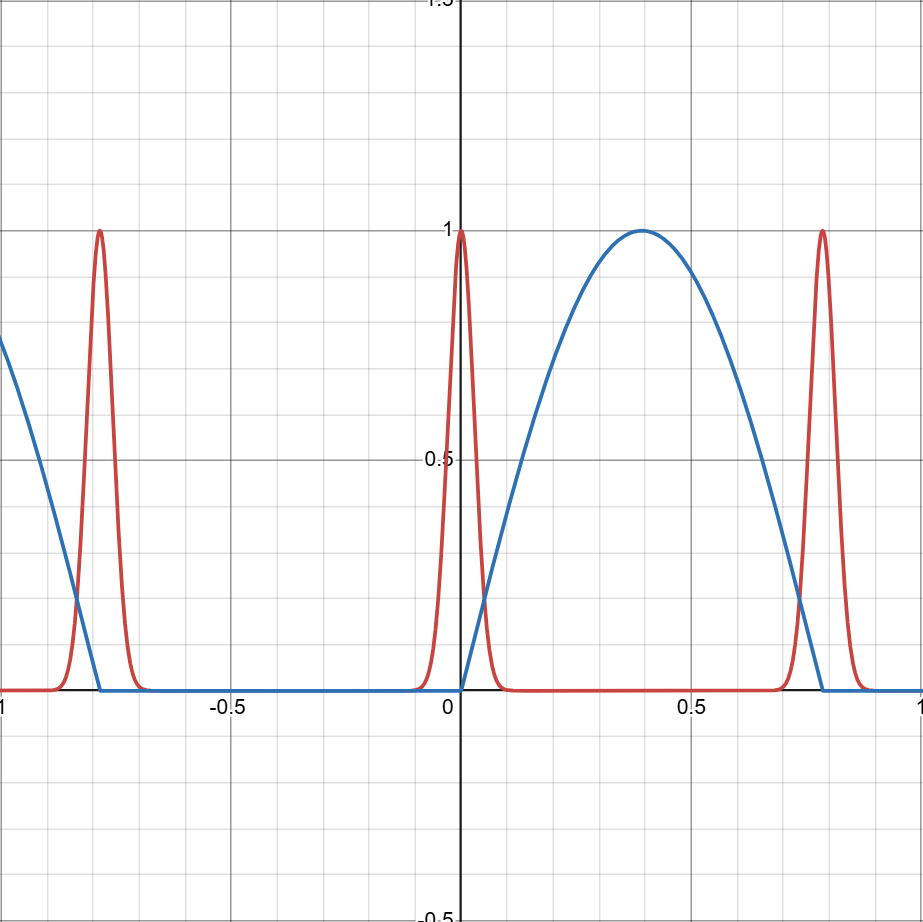
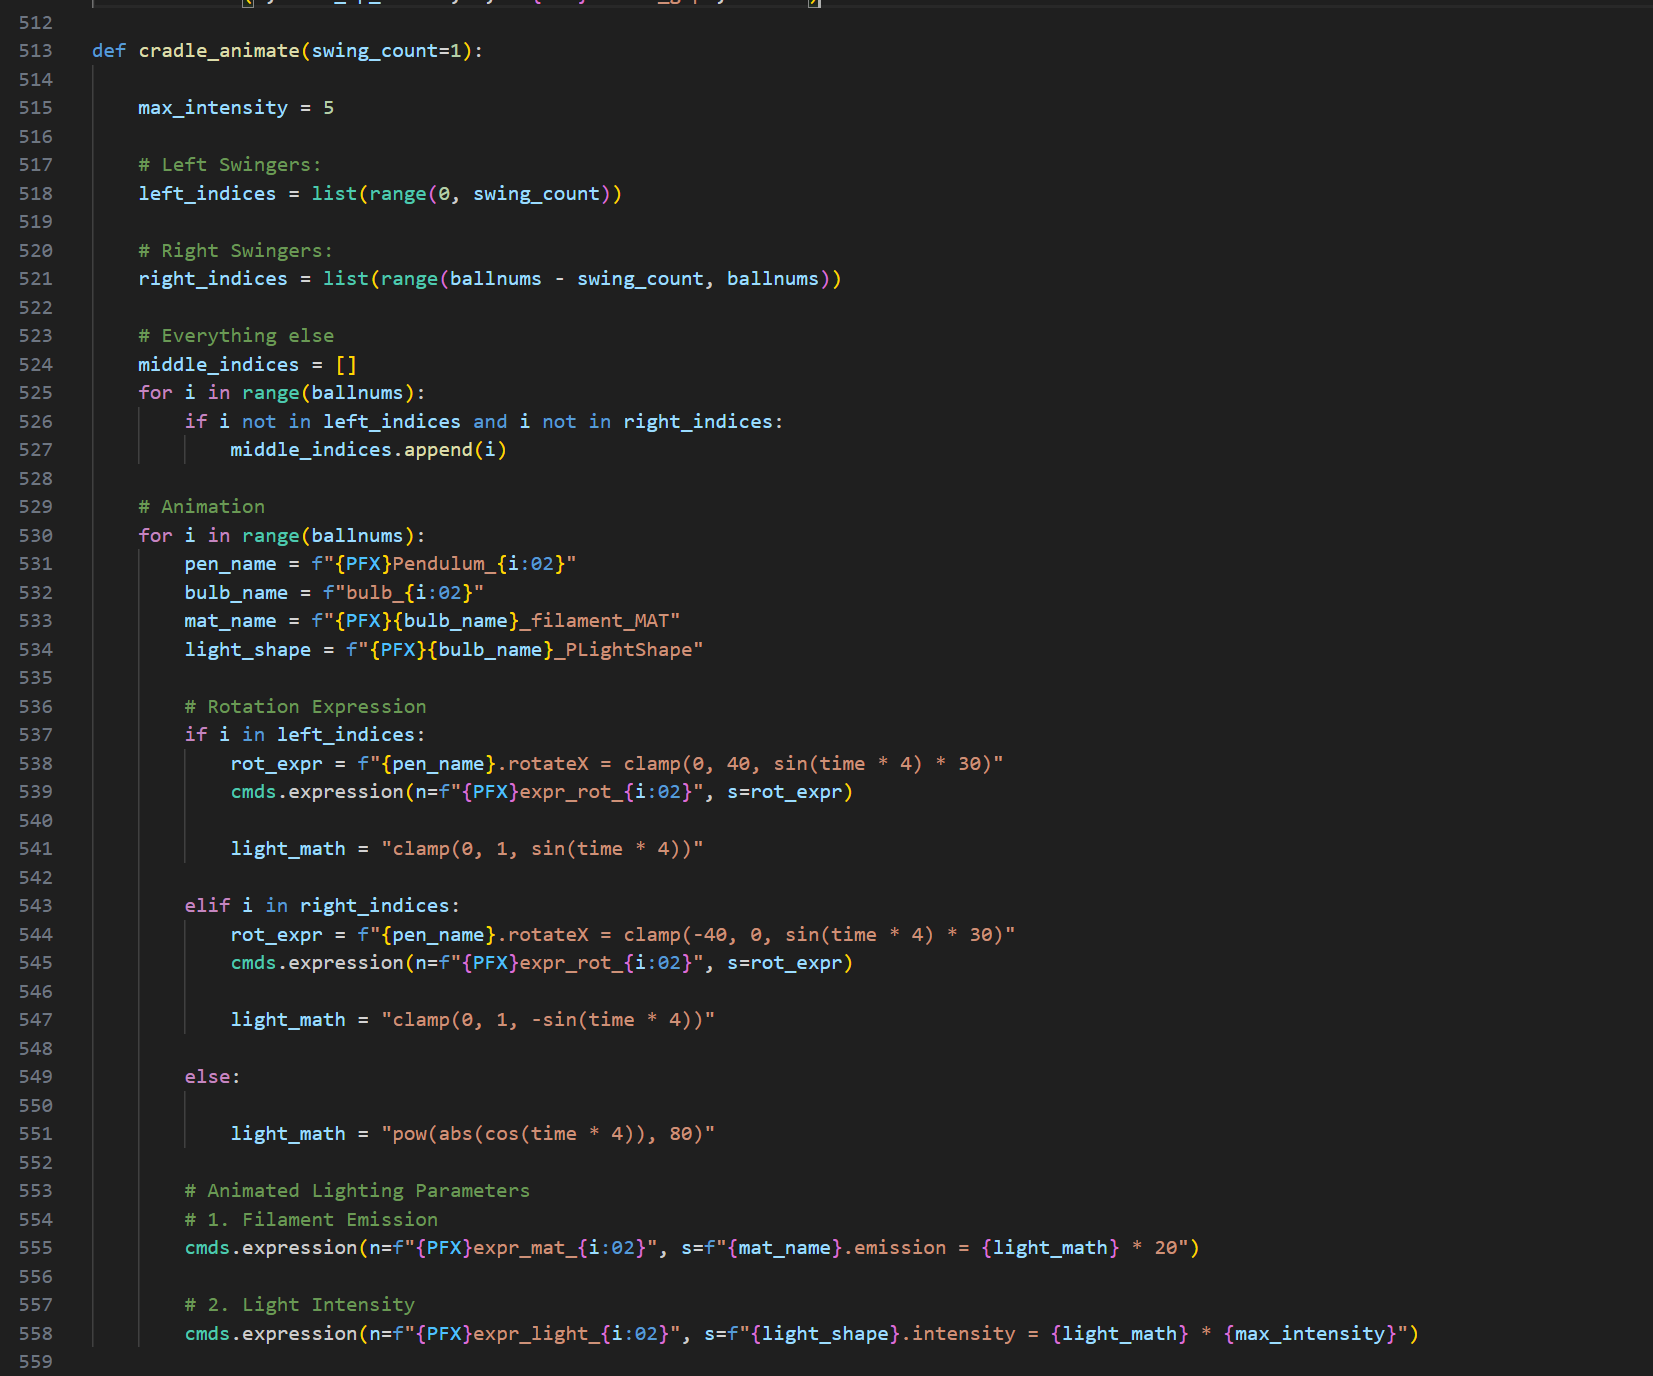
I didn't want to keyframe the lights. I wanted the system to know when an impact happened. I wrote a custom expression to drive the filament emission:
Emission = pow(abs(cos(time * 4)), 80)
By raising the cosine wave to the power of 80, I created a sharp operational spike that turns the light ON only for the split second the rotation hits 0. This is the kind of "high-fidelity" detail that you might miss at first glance, but it makes the physics feel real.
Shading
To eliminate the repetitive labor of manual network construction, I developed a modular shading pipeline using maya.cmds. Instead of connecting individual nodes by hand, I wrote a robust assign_material function that procedurally generates complex Arnold shading networks — linking Diffuse, Roughness, Normal, and Displacement maps with correct color space settings automatically. A key component of this system was the enforcement of a Scene-Linear Rec.709-sRGB workflow; the script sets all incoming data textures to "Raw" while managing the internal aiStandardSurface attributes for physical accuracy. For the glass bulbs and filaments, I bypassed texture maps entirely, utilizing Arnold's transmission and emission attributes to achieve realistic dielectric properties and dynamic lighting directly through code.
Optical Physics
I refused to manually focus the camera. If the user changes the number of balls, the cradle gets wider, and the center shifts. A manual camera would lose focus.
I implemented a vector math solution (Euclidean distance) to calculate the exact distance between the camera lens and the center of the cradle in 3D space. I fed this data directly into Arnold's aiFocusDistance. The result is that no matter how the scene is generated, the render is always perfectly sharp.
import math

# 1. Get the Camera's Position in World Space
# q=True means "Query", t=True means "Translate", ws=True means "World Space"
cam_pos = cmds.xform(camera, q=True, t=True, ws=True)

# 2. Define the Target (The Center of the Cradle)
target_pos = [0, 0, 0]

# 3. Calculate Euclidean Distance
# Distance Formula: sqrt( (x2-x1)^2 + (y2-y1)^2 + (z2-z1)^2 )
dist = math.sqrt(sum((cam_pos[i] - target_pos[i])**2 for i in range(3)))

# 4. Apply to Arnold Focus Distance
cmds.setAttr(f"{camera}.aiFocusDistance", dist)

# Optional: Print for verification
print(f"Auto-Focus Locked at {dist:.2f} units.")
Custom User Interface
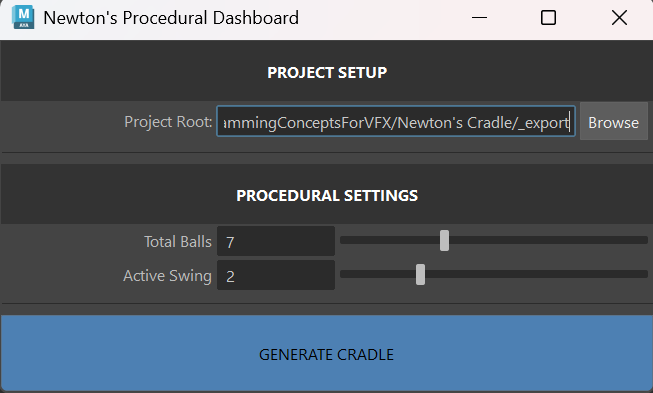
For the procedural control dashboard, I utilized a "vibe coding" approach — defining the logic and user experience I wanted in plain English and letting the AI generate the implementation. I knew I needed a window with specific sliders for bulb count and swing numbers, plus a file browser for the project root, but I didn't want to spend hours looking up textFieldButtonGrp or intSliderGrp syntax. I described the functionality to the AI: "Create a Maya UI window that lets a user browse for a folder and updates a text field." The AI generated the complete UI structure, which I then audited and refined to ensure the callbacks correctly updated my global variables. This allowed me to implement a robust tool in minutes rather than hours, focusing my energy on the system's architecture rather than the syntax of the interface.
Project 4: Procedural Lotus Pond Tool
This lotus pond is one of the more technically involved projects in my coursework. Rather than compress the breakdown into a few bullet points, I've written a dedicated post covering the full architecture — from the L-system vein parser and probability engine to the Python-to-MEL bridge and pipeline philosophy. If you're interested in how the system actually works under the hood, the full technical breakdown is linked below.
Building a Procedural Lotus Pond in Maya: L-Systems, Python, and Pipeline Architecture →
AI Usage: How I Work With AI to Achieve More
I view AI not as a replacement for technical knowledge, but as a high-velocity accelerator for learning. Instead of spending hours hunting through documentation, I treat the AI as a Senior Technical Director sitting next to me — one that helps me move from "concept" to "execution" immediately.
- Instant Syntax Retrieval. I don't memorize every flag in the
maya.cmdslibrary. Instead of manually searching Autodesk's documentation for the specific parameters of a command likepolyAutoProjection, I ask the AI to generate the correct syntax for my specific context. It turns a 10-minute search into a 10-second retrieval. - Deep-Dive Explanations. When I encounter a complex function or a piece of code I don't fully understand, I ask the AI to break it down line-by-line. This allows me to understand the logic behind the code — why a loop is structured a certain way, or how a vector math formula is being applied — rather than just copying and pasting blindly.
- Debugging Partner. When a script throws a cryptic runtime error, I paste the traceback and the relevant code block into the chat. The AI identifies logic gaps — like variable scope issues or data type mismatches — that human eyes often miss. It acts as a second pair of eyes that never gets tired.
- "Vibe Coding" (Feature Generation). For the Newton's Cradle dashboard, I knew what I wanted (sliders, buttons, and file dialogs) but didn't know the
textFieldButtonGrpsyntax. I described the functionality I needed — "I need a UI window that lets a user browse for a folder and updates a text field" — and the AI generated the complete UI structure. I audited the code, refined the logic, and implemented a working tool in minutes rather than hours. - Tool Preference: Gemini Pro. I explicitly prefer Gemini Pro over ChatGPT for my VFX workflows. In my experience, Gemini demonstrates a significantly better understanding of the specific node architectures inside Unreal Engine 5 and Houdini. It provides context-aware solutions for 3D software that other models often hallucinate or oversimplify.
The result: using AI has allowed me to learn faster and achieve more. By offloading the rote memorization of syntax to the AI, I can focus my energy on the architecture of the system — solving the higher-level problems of topology, physics, and user experience.