USD Basics
Living post: USD changes quickly. I’ll try to keep this page up to date with new terms, better examples, and pipeline notes.
Last updated: January 12, 2026.
This document serves as my personal study notes. For a more in-depth introduction to USD, visit openUSD.org.
What is USD?
Universal Scene Description (USD) is a framework—and a family of file formats—for describing, storing, and exchanging complete 3D scenes. Rather than only saving geometry, USD can package many parts of a production scene in a structured, scalable way, including geometry and attributes, materials, animation, lighting, cameras, instancing, and render settings. Because it supports both a standardized scene representation and a workflow for assembling and updating assets, USD scenes can be reliably loaded and shared across most professional VFX and 3D software.
types of data USD can store
Geometry
Geometry Attributes
Materials
Animation
Lighting
Cameras
Render Settings
Instances
…
Why the CG industry is transitioning to USD pipeline?
USD matters because it makes collaboration on complex 3D work far more practical. Instead of relying on a huge, custom-built pipeline to keep everyone in sync, teams can work on the same shots and sequences with a shared scene description that holds up at production scale.
It’s also built for non-destructive workflows. USD keeps scene data “alive” and editable through layered opinions, so changes can be added, overridden, or rolled back without tearing the whole scene apart. That structure makes iteration safer and more predictable—especially when multiple departments are touching the same assets.
Another major advantage is consistency over time. When assets or scene components get updated, those updates can propagate across a shot or even an entire sequence, reducing repeated manual fixes and keeping look and layout aligned.
USD is designed to handle heavy scenes efficiently. It stays performant as projects grow, and it supports smart strategies like variants (multiple versions of the same asset) and payloads (only loading what you need, when you need it). That makes USD particularly asset-friendly: you can preserve materials, assignments, and render-related properties across different tools instead of rebuilding them every time you transfer data.
Finally, USD isn’t just a file format—it’s a pipeline mindset. It’s increasingly supported across professional VFX and 3D software, and the industry trend is clearly moving toward USD as a standard for scene assembly, collaboration, and rendering. If you’re working in Houdini, Solaris is one of the most complete authoring environments for taking advantage of these USD workflows in a structured way.
TLDR:
Collaboration at scale: Teams can work on the same shots/sequences without needing a massive custom pipeline.
Non-destructive workflow: Layered “opinions” let you override, iterate, and roll back changes cleanly.
Consistent updates: Asset and scene changes can propagate across a shot or entire sequence.
Handles heavy scenes: Built to manage complex, data-rich environments efficiently.
Asset-friendly: Preserves materials/assignments/render properties across software; supports variants and payloads.
Efficient loading + smaller files: Modular structure and payload-based loading reduce memory usage and keep files manageable.
Render integration: Designed to connect cleanly with render engines in modern pipelines.
Industry momentum: Broad DCC support and strong trajectory toward being the standard for 3D collaboration and scene assembly.
Solaris (optional note): A strong USD authoring environment that exposes these benefits clearly in practice.
What is Layer in USD?
USD Layer is essentially a .usd file on disk. Here are some common USD file extensions and what they meant:
.usda is the human readable usd file type.
File sizes are larger but can be helpful as “pointer files” or debugging.
.usdc is the binary encoded usd file type.
File sizes are much more efficient and smaller in overall size but they are not human readable.
.usd can contain either of the above, but are typically .usdc
.usdz packages all dependent layer files and textures together
not great for use in production VFX pipeline
used typically for phone AR applications.
Why are USD files called layers?
It’s because of our ability to combine (layer) multiple usd files together to create a single scene. You can build the exact same 3D scene in USD with vastly different underlying layer.
the layered approach: multiple underlying layer, point to the .usd files, updating automatically, small file size (serve as a pointer only).
the flatten approach: singular layer, all information baked, not updating. large file size.
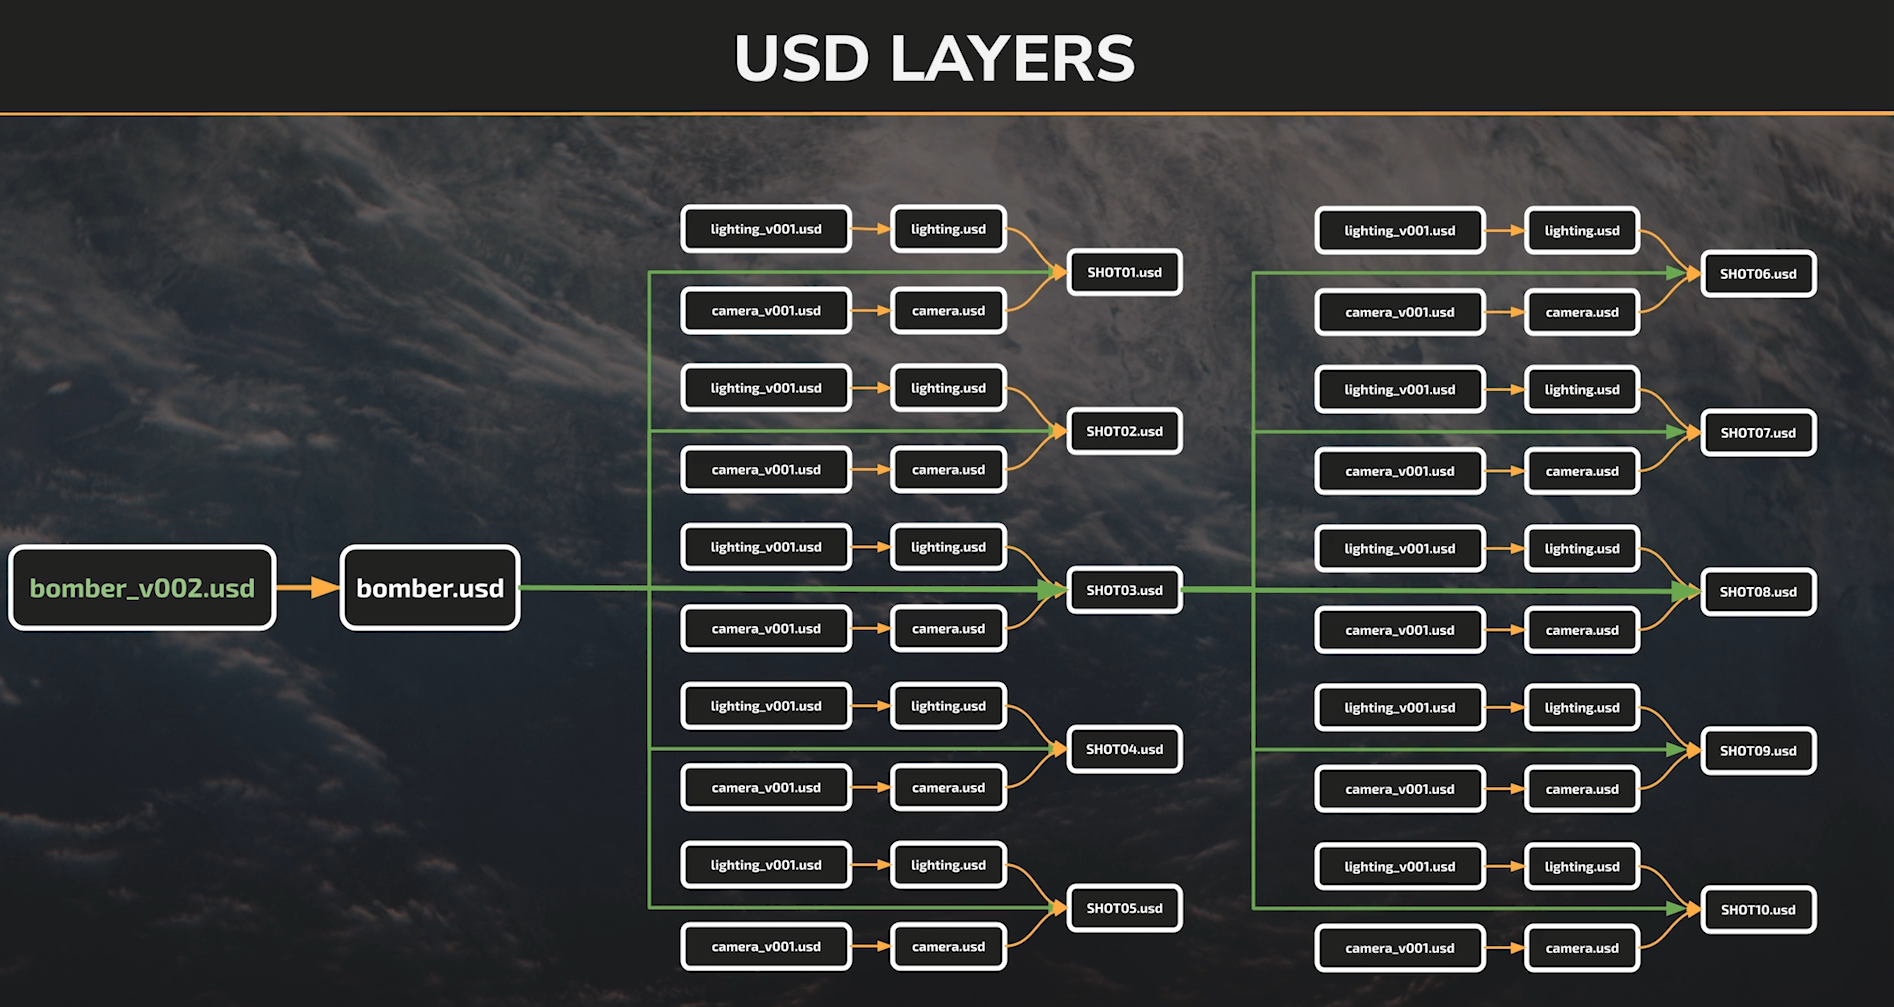
USD Composition Arcs
How usd layers combine together to build a 3D scene.
Sublayer
Sublayer is the most basic way to add USD file to our scene.
It tells us to add the primitives in the selected USD file without renaming or repositioning our primitives.
References
A reference is generally used to assemble individual assets into sets and scenes.
Payload
Variants
Inherits
Specializes
The main difference between a sublayer and a reference is that:
sublayer brings in the scene, and the path is not modifiable.
refence brings in a specific primitive (and its child primitives) to the scene and the path is modifiable.
Opinions
An opinion is expressed when we set a value on a USD attribute or property.
Having an opinion is always stronger than having no opinion.
Writing USD Layers
Save Style
flatten implicit layers (when you work with others & need to sublayer in other usd files).
flatten all layers ( when you work on your own, everything lives in the save file).
CONfigure layer
saves the node tree above in to a usd files.
OUTPUT Processors
Copy All Assets to Referencing Layer Directory
saves all textures to disk. make sure to specify the name for the folder.
make sure this processor is on top when used.
Save Paths Relative to Output Path
./data/camera.usd
$HIP/usd/RBL3_0101_lgt_v002/export_v006/data/camera.usd
Saving Animation
For multi-shot sequence, follow this workflow:
create a configure layer node. specify the frame range
In USD ROP - frame range - choose Render Frame Range From Stage
Configure layer for each shots & use a switch node to toggle shots. This way we don’t need to readjust frame range in the USD ROP for each shots rendered.